Tuesday, November 29, 2011

Holiday Tuesday!

Happy Holiday Tuesday, crafters!

Today I found some more fabulous finds!  

Printable Paint Stick Ornaments

http://todaysfabulousfinds.blogspot.com/2010/11/printable-paintstick-ornaments-tutorial.html

Today's Fabulous Finds has such 'fabulous finds'.  There is a whole tutorial and free printable on how to make these adorable ornaments that can be used for all sort of things.  You can use them as tags on gifts, on trees, anything your crafty mind can think of doing with them.


Ready to get Started?  Here's what you'll need:

Paint sticks:  The paint sticks must be the large 5 gallon sticks (nearly 1 1/2" wide).  Lowe's will sometimes give them to you for free as well as Home Depot.   Home Depot sells them in bundles.  Wal-mart sells them for .28 each.
Tip:  If you ask the employee if you can buy some from them to make a craft, most often they will just give them to you for free.  Yep, FREE!

Ok that is all you need, go to the website and get the printables or you can do anything else you like with those.  Christmas paper and mod podge it to the wood, cut your own phrases, paint them, those are just other ideas - which are endless.

Thanks for dropping by and I hope you enjoy as much as I do.  Thanks to Today's Fabulous Finds!

Enjoy the journey, live well, laugh often, love a lot, and be happy ;)
({hugs})
Jackie

Monday, November 28, 2011

Holiday Monday!

Good day, All!

I hope everyone had a fabulous Thanksgiving, so much to be thankful for everyday.

This will be a Holiday month!  Soon it will be Christmas and there is a lot of work to do.  I have to decorate my house for Christmas. I have officially started this weekend my long, but fun process.  I need a lot of time because I put up several trees with different themes.  I love a lot of decorations and a lot of 'stuff'!

I will give you a progress of my deco as I go along.

Today I want to share this fabulous snowman family!  So cute!  I have a corner dedicated to my snowmen and these will be part of the family this year.
Are these not sooooo cool or what!


How To Make A 2x4 Snowman Family 

Cut out 8-2x4 blocks (2" x 3 1/2")
Sand the edges, giving them a chunky look.
Paint the blocks.  Vanilla is a nice color. 
Sand the edges to give them a distressed look.
On three of the blocks, tape off the top section for the hat.  (mixed dark brown and black paint together for the hat color.)  Right after they are painted, peel the tape off.  After the paint is dry, sand the edges to let some of the white paint through.
For the lower sections, choose scrapbook paper that you like and Mod Podge it to the front of the remaining 5 blocks.  Follow the same directions as in steps 7 and 8 used here to apply the paper.

Drill two holes for the twig arms in the center of each side (of the center block) for each snowman.  Drill a hole about 1 1/4" deep.  I plan to hot glue them together.  Embellish their faces, buttons, noses, eyes, scarfs, hats anyway you like, make it your own.

For further directions go to Today's Fabulous Finds: http://todaysfabulousfinds.blogspot.com/2011/01/2x4-snowman-puzzle.html

Enjoy the snowman!  Thanks for dropping by.
Enjoy the journey, live well, laugh often, love a lot, and be happy ;)
({hugs})
Jackie


Saturday, November 26, 2011

Saturday Project

Greetings, All:

Just dropping in for a quick hello and to share my Saturday project.

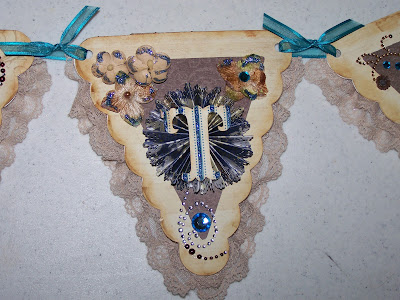
I had to stop today from my Christmas decor because I entered an event on a Banner swap with Creating the Crafty Life  http://creatingthecraftylife.com/ and I had to finish my partner's banners to mail on Monday.  I finished!  Yay!  I must say I am very pleased with both.  I only had to create one, but since we didn't want the Christmas theme (that was one of the rules) we went ahead and picked out different themes for our choice, but I still made a mini Christmas banner for my swap partner (Paula).  It came out so adorable.  I made both, the Christmas one (that we were suppose to make) and "Create" for her craft room (her color choice are browns and blues).  I want to keep them - lol.

I wanted to share with you what they look like.  Thanks for dropping by.  I will be back on Monday.  I must get back to decorating, that is going to take me several days!  I'll share the progress as I can.

Here are the banners, hope you like, leave some crafty love.
Both Banners
'Noel' and 'Create'

mini Christmas Banner
3x5"
'NOEL'


Thanks for dropping by.  I had to share.

Enjoy the journey, live well, laugh often, love a lot, and be happy:)
({hugs})
Jackie

Thursday, November 24, 2011

Thankful Thursday!

Happy Thanksgiving to all!

I hope everyone has a fabulous day filled with food, family, friends, love, and happiness!  Until next week.  Time for Christmas decor, lots of work to do.

Enjoy the journey, live well, laugh often, love a lot, and be happy :)
({hugs})
Jackie

Wednesday, November 23, 2011

Thankful Wednesday!

Well, it's almost time!  Gotta run last minute errands, get nails done, and relax.  I am thankful for all my family and friends.

Today wanted to share a quick idea.  I really love Tatertots & Jello  they have fabulous DIY projects as I have stated before.  From crafters all over.  Check their site: http://tatertotsandjello.com/2011/11/make-a-striped-paper-straw-wreath-christmas-tutorial.html

Here is a cool and easy Christmas wreath.

Thanks for dropping by.  I hope everyone has a fantastic and safe Thanksgiving.  Thanks for dropping by and all your comments are appreciated.

Enjoy the journey, live well, laugh often, love a lot, and be happy ;)
({hugs})
Jackie

Thankful Tuesday!

Look at another fabulous idea!  These are totally awesome - thanks Lucy for inspiring. (I posted her site below).


NOVEMBER 22, 2011


Nordic skiing....ornament series nummer fyra

Good day to you my sweet friends.  Another day.  


Look at these adorable little Scandinavian style skis.  Scandinavian decor is a favorite style, with the beautiful crisp white interiors and little touches of bright colours.

Even though I love the vintage look of old books, nothing says Christmas like the traditional red, white and green....

This one is made by Lucy's son, Tristan

 Click on the pictures to enlarge
Click on the pictures to enlarge


As you can see, you can use a toothpick to paint the details but you can use a stencil to make it easier, or just glue a pretty ribbon to the skis instead of painting them.  As usual, I encourage you to make it your own and run with it!  These can be used on packages, ornaments, LO, treat bags, the ideas are endless.

Please visit Lucy's blog and check out other fabulous projects.
http://craftberrybush.blogspot.com/2011/11/nordic-skiingornament-series-nummer.html?showComment=1321800764266#c3602851533532368886

Thanks for dropping by again, love your crafty comments always appreciated.
The sun is shining and life is good!


Thanksgiving is approaching us fast, I am thankful for breathing and everyone around me!

Enjoy the journey,  live well laugh often, love a lot, and be happy :)
({hugs})
Jackie


Monday, November 21, 2011

Thankful Monday

Greetings, Everyone!


I wanted to share this great find with you all today.  Tatertots & Jello always has fabulous craft DIY projects.  This one is easy and I love the look for a quick decoration for your door.  It is by: The Polkadot Chair http://www.polkadotchair.com/2011/11/grateful-wreath-tutorial.html.


It's a Thanksgiving themed wreath.


It is inspired by the new Grateful Glam digital line at Rhonna Designs!


Here's what you need to make it:

- 14" Straw Wreath (you could use 16" or 18" easily)
- U shaped pins
- Paper & Printer
Grateful Glam Backgrounds Kit Brush Kit or  Tags N cards kit
- Old book
- Ribbon
- Glitter
- 2" satin ribbon


Print out several copies of the grateful glam background elements on white cardstock.  You can use 12x12 paper or you can use 8.5x11 easily, just print more copies.

Cut paper into 2" strips lengthwise (you will have 2" x 11" or 12" strips). 

Cut up an old book into 2" strips also.  The book pages can be a bit shorter than the printed strips.

Glue one book page to the back of each paper strip.

Using antique linen distress ink, lightly distress the edges of all of your pieces.


Fold your strips in half (do not crease) and start pinning them using the U shaped pins to the wreath.  You will have 2 strips across the front of the wreath and one on the outside edge of the wreath. 


Keep pinning overlapping your strips until you've covered the entire front.

Side view


Using two 2" wide strips form a rosette by folding the paper accordion style. (you will be working with 2" x about 20" strip of paper).

Print off the bee element and punch out with a circle punch. Attach to rosette.

Embellish with lace and glitter.

Glue a piece of satin ribbon to the back of the rosette, and glue to your wreath. Use hot glue for this part.

Use some extra satin ribbon to hang your wreath, and your done!

Keep in mind you can change this around, add more, make less, different colors, different papers, the ideas are endless.  But the inspiration is awesome.  Thanks Tatertots & Jello for sharing.  Great job Polkadot Chair!

Enjoy the journey, live well, laugh often, love a lot, and be happy :)
({hugs})
Jackie


Saturday, November 19, 2011

Thankful Sunday

FIRST:  I want to wish my beautiful, intellegent, and sometimes I don't understand, but always will love and cherrish, lovely child o'mine (daughter) a very very Happy Birthday!  May your days be filled with happiness, laughter, and joy with the people that truly love you!  Your Family!  I will forever and eternity love you with all my heart unconditionally!  Happy 23rd, Ashley!
http://www.youtube.com/watch?v=P90dKxlsUJo&feature=related
pre-k  3 1/2 years old
Now on to more fun!

Here is a another great giveaway from the couple that keeps on giving.  Help them reach their 700 follower goal.  There projects are amazing.  Here is all the information.  Go now, hurry.

http://cricutcouple.blogspot.com/2011/11/thank-you-giveaway.html?showComment=1321774401095#c956295153607139850


THANK YOU GIVEAWAY!!!

Hey Ya'll,
Well, it's the 19th... So that means that we have another announcement to make.  We had such a great time and such a wonderful response to our 500+ follower celebration that we actually bypassed 600 followers!!!  Can you believe it?!?  YAY!!!  We are so thrilled!  So, what do we do now.  Well, how about another giveaway?  As we mentioned before, we both work in retail.  It's the busiest time of the year!  Next week is Thanksgiving, or in our house, known as Black Friday.  Hee! Hee!  Thing have been so nuts, that we haven't had time to do much crafting lately, so we are a little light on content.  Since we had so much fun with the last giveaway, we are going to do it again and see if we can reach 700 followers!!!  There will be 4 prizes.  One Big Prize and three little surprise prizes just for fun.  The big prize is going to be...

THE FULL SIZED CRICUT CAKE MACHINE
with Cricut Cake Basics Cartridge
That's Right!  We had so much fun with this and were so excited to see so many new followers that we ordered another machine!  Just for you!

This post will be where the winner is selected from.  There are three ways to win, like before.

1.  Comment here telling us the funniest and/or craziest thing you have ever done and/or scene during Christmas.  We can't wait to hear these stories!
2.  Keep the celebration button on your blog until the extension is over (repost letting us know you did or are going to).
3.  Announce the extension on your blog again (please repost with a link).

You don't have to do all of these, but each one will give you another chance to win.  We will announce the winners on Monday, November 28th.  The three surprise gifts will not be announced.  These are just for fun and will be announced on the same day as the winner of the machine.  This contest is open to followers only, so if you aren't a follower already, you will need to be one to be eligible to win.


Thanks for dropping by again, I know everyone will be busy preparing for Thanksgiving.
As always your comments are very appreciated.  Please come again.
Enjoy the journey, live well, laugh often, love a lot, and be happy ;)
({hugs})
Jackie


Friday, November 18, 2011

Friday!

Hello, Everyone.  I have been away a few days.  I have been busy at work and when I get home I haven't felt well, so no time for projects.  That is why I haven't posted.

This is an update:  Today Diego had surgery, neutered, all is well.  My little puppy boy will be home by 5:00 p.m.  Also tonight we are going to go see BREAKING DAWN, Part 1 - The Twilight Series (if you have been under a rock, this is the best series out - must read books first, they rock).  Cable has been airing the first three movies all week.  Twilight, Twilight: New Moon, and Twilight: Eclipse.  Must see!  I can't wait for the movie night tonight - I so need a relaxation evening.  Also this weekend, on Sunday, is my daughter's 23rd Birthday.  1988, November 20th, was an exciting day.  I was given a precious gift from above, an angel to care for, to love, to provide for, and cherish. Sunday she will be 23 and is now a grown young lady.  I wish her well and hope she continues to make wise, smart decisions in life.  That is all I ever want for her.

So, I probably won't get back into the routine until next week.  I wanted to share and remind you all about a fabulous giveaway.  Go check it out.  Here is is:

It is a fabulous CHRISTMAS CANDY GIVEAWAY again at Candy's Craft Corner!  I do have her button on my sidebar, just click there too, but here is the link.

http://candyscraftcorner.blogspot.com/2011/10/huge-christmas-candy.html#comment-form

Go check it out, three holiday cricut cartridges!
MAKE SURE YOU READ THE WHOLE POST TO FIND OUT HOW YOU CAN WIN ALL 3!! 
Thanks for dropping by today.  I hope to be working on some projects this weekend.  Will post more later.  Have a great Sunday.
({hugs})
enjoy the journey, live well, laugh a lot, love often, and be happy.
Jackie

Tuesday, November 15, 2011

Tuesday Tasks!

Good Day, Everyone:

This week has been a busy week at work.  I have lots of paperwork to accomplish and dockets to post online and things to organize and trials to set.

I also would love to be crafting and creating more, but family and work take priority.

I wanted to share my project with you.  I am doing an altered frame swap with http://creatingacraftylife.ning.com/ my swap buddy is Ashley check her blog too http://theglamoroussideofscrapping.blogspot.com/

I have completed the frame, finally.  I should have taken a picture of the frame before, but I always forget when I alter a project.  I have to get in the habit of taking a before and after picture.  I will eventually remember the steps and get them straight so I can share the whole project I am working on with you.  The frame started out to be white w/pink poka-dots.  Then I painted it black, I put crackle paint on it, I then tried to put a vintage color on it to get it a weathered look and I didn't like the look, so I went back to black with crackle.  I made the roses from paper.  Inspired by Tim Holtz (but cut with George Cart) that idea is from Kathy, Paper Phenomenon http://www.paperphenomenon.blogspot.com/.  She posted a tutorial on utube (here is the link: http://www.youtube.com/watch?v=edApDLVUWSw) The roses come out beautiful and you can use them on almost anything.  I love flowers and use them a lot, I keep a box made for use.  I embellished the corners (I don't know when to stop) and accented with 'making memories' vintage metal tag and 'Tim Hotlz' ideaology tag, also 'little yellow bicycle' clear cuts 'love letters'.  Yes, I believe that was all (all I could fit on it anyway - lol).  I am very pleased with it, I love how it came out and I hope that Ashley does too.  Here are the photos of the completed project.


Thanks for dropping by as always your comments are very appreciated.  Please come again.
Enjoy the journey, live well, laugh often, love a lot, and be happy ;)
({hugs})
Jackie

Monday, November 14, 2011

Pleasant Monday

Good Day, Everyone:

I hope everyone had a fabulous weekend.  Here in Houston/Pearland, the weekend was gorgeous and the nights were lit by bright full moons.  It was beautiful.  Today, not so much.  Gray and cloudy.  But I'll take it, that means I am breathing and alive!

I was blogging, scrapping and working on swaps and banners.

Today I want to share a banner I made to send to the Children's Hospital.  It was my first banner and I am extremely proud of it.  I will start working on a banner for my own mantel.  I thought I would donate a banner to the children's hospital in PA.  If you are interested in making a banner and want to send it, please go to Ellen's blog: http://cardmonkey-business.blogspot.com/2011/11/blog-hop-winners-announced.html.

I loved making this banner.  Have a great Monday.  Below is how I made it.


I used my CTMH Art Phil Cart.  I used a scaloped banner and stretched it, I welded the x*mas to the MERRY banner so I would not have a banner 10 ft long (well, a bit exaggerated but...you get the point).  I made rosettes 2" long and used a punch for edges, I cut the word MERRY from CTMH Art Phil cart too using gold glitter paper from the paper studio.  The embellisments I got from the Dollar Tree, Michaels, and Hobby Lobby.

I hope you enjoy, thanks again for dropping by.
Enjoy the journey, live well, laugh often, love a lot, and be happy ;)
({hugs})
Jackie

Saturday, November 12, 2011

Quick Sunday

I wanted to share my newest project with Joyful Stamper, inspire me Fridays.  This is a great way to show off your projects and possibly be featured.

Please go visit: http://joyfulstamper.blogspot.com/2011/11/inspire-me-fridays-32-linky-party.html

This is my inspiration post for Joyful Stamper: inspire me Friday!


I am posting my Christmas Banner. I made this specially for The Children's Hospital in PA, they are in need of banners to put in children's rooms during the holiday season. If you want to help, please visit
http://cardmonkey-business.blogspot.com/2011/11/blog-hop-winners-announced.html

Enjoy the journey, live well, laugh often, love a lot, and be happy ;)
({hugs})
Jackie

Popular Posts

Never Growing Old